How to Create Case Team Roles in Salesforce
In this tutorial on Salesforce, we will learn about the process of establishing case team roles within the platform. We will explore how to create procedures for case team roles in Salesforce Lightning and Salesforce Classic.
A case team comprises of individuals collaborating to resolve cases efficiently. Within this team, various roles such as case owner, manager, assignee, collaborator, reviewer, and creator play essential functions.
In a Salesforce-driven organization, the creation of case team roles became necessary to address a specific task. To accomplish this, we utilized the case team roles object, accessible via the Feature settings under Service.
After evaluating multiple solutions, we identified an effective approach to establish case team roles in Salesforce. Whether you’re operating in Salesforce Lightning or Salesforce Classic, this tutorial provides comprehensive guidance.
Overview of the topics covered here:
-
- Configuring case team roles in Salesforce
-
- Setting up case team roles in Salesforce Lightning
-
- Establishing case team roles in Salesforce Classic
Establish case team roles within Salesforce
In Salesforce, a team constitutes a collective effort aimed at resolving cases and addressing customer support requests. Each team member assumes a crucial role in the resolution process.
Within the team, various roles are assigned to manage cases effectively, such as the case owner, manager, assignee, collaborator, reviewer, and creator.
The case owner takes charge of overseeing the case, ensuring resolution, updating its status, communicating with the customer, and ensuring timely resolution.
The case manager handles cases requiring special attention, while the assignee is tasked with resolving specific cases and gathering pertinent information.
A case collaborator contributes additional insights and expertise to resolve cases effectively.
The case creator initiates the case and inputs all relevant information accurately.
The above paragraph outlines how to setup case team roles in Salesforce, covering both the Salesforce Lightning and Salesforce Classic interfaces.
Setting up case team roles within Salesforce’s Lightning Interface
In this guide, we’ll outline the process of configuring case team roles within Salesforce Lightning. To get started with setting up case team roles in Salesforce Lightning, adhere to the following steps:
Step 1: Access your Salesforce Lightning account by logging in. Navigate to the gear icon located in the interface. Beneath the gear icon, you’ll find two options: ‘Setup’ and ‘Service Setup’. Choose the ‘Setup’ option.
Step 2: Upon selecting the setup option, the setup page will open. Type the desired case team role into the Quick Find Box, where the case merge object will be displayed at the top. Click on the specified case team role, where you will find the escalation rules located under Case Teams.
Step 3: Once you’ve selected the case team role, the corresponding page for case team roles will open up. Here, you’ll notice a centrally located button labeled “New.” Simply click on this button to proceed.
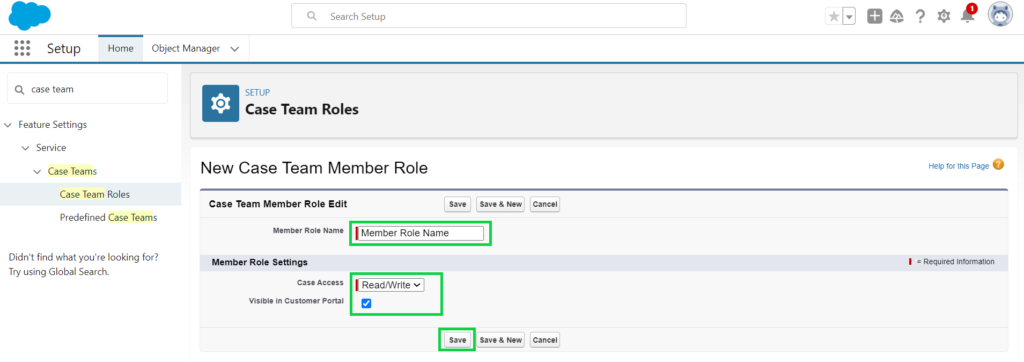
Step 4: Upon selecting the “New” button, a new page for the role of a case team member will be displayed. Initially, you can modify the role of the case team member and designate the role name as “Executives.”
Next, configure the role of the member, granting access to the case with both Read and Write permissions. Ensure to mark the “Visible in Customer Portal” checkbox, then proceed to save the changes by clicking the “Save” button.

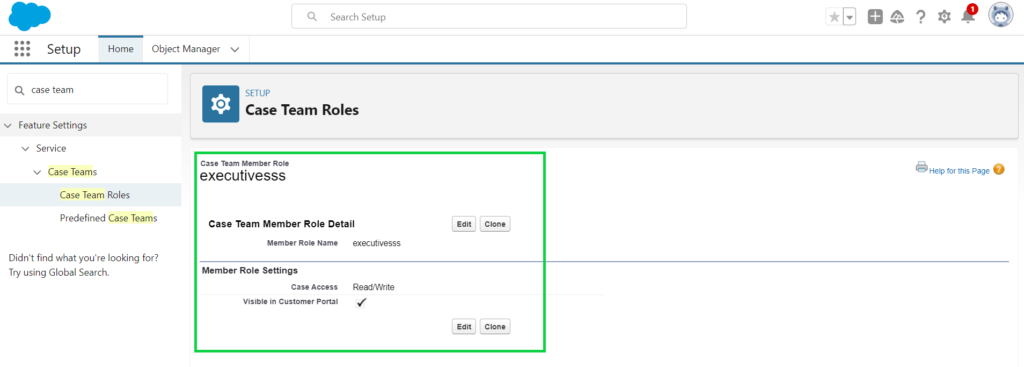
Step 5: Upon pressing the save button, the role of the case team member as an Executives is established, granting us the ability to modify and duplicate this team member role.

We’ll explore the process of setup case team roles in Salesforce Lightning, followed by a walkthrough of setting up a case team role in Salesforce Classic. Let’s explore the details.
How to Set up Case Team Roles in Salesforce Video Tutorial
You may also like

Salesforce FAQs


7 Comments