
How to set up forecasting in salesforce
Businesses utilize sales forecasting to anticipate their performance, making it an essential tool for budgeting and setting expectations for the C-Suite. Sales forecasting is vital for nearly any business as it impacts sales deployment, financial planning, budgeting, operations planning, and marketing strategy. Understanding how to set up forecasting in Salesforce is crucial to leveraging these benefits effectively.
Step #1: Activating Forecasting:
To begin, make sure that forecasting is activated while set up forecasting in Salesforce.
Here are the steps:
- Click on the gear icon located in the top-right corner and choose Setup.

- In the top-left corner, enter “Forecast” into the Quick Find box.
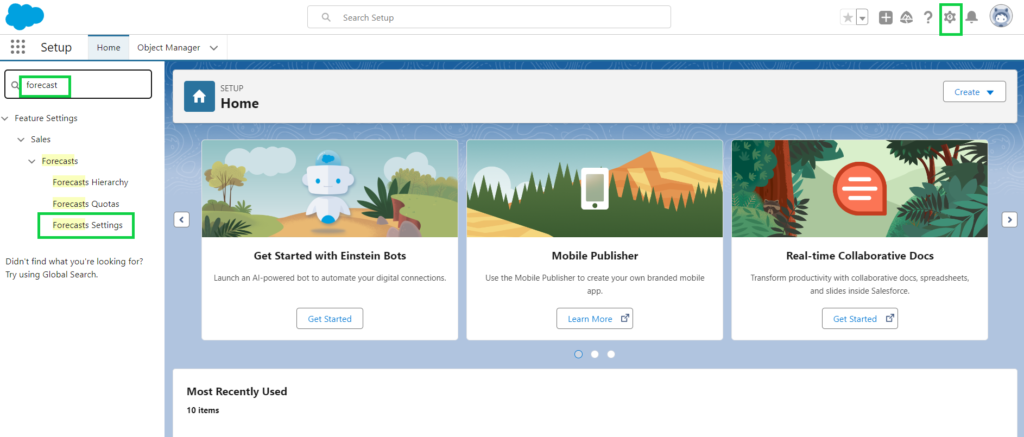
- Once “Forecast Settings” appears, select it.
- Tick the box labeled “Enable forecasts.”

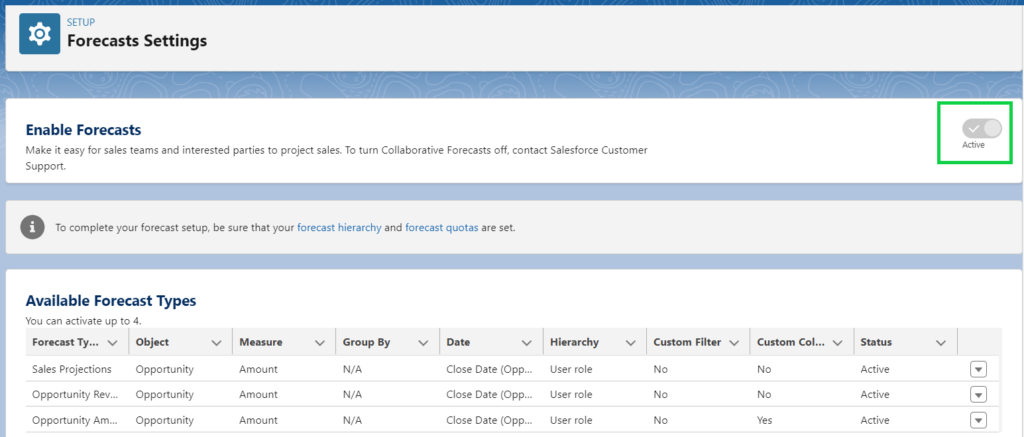
Please scroll to the section labeled “Enable Forecasts Adjustments.” Ensure that both the “Enable manager adjustments” and “Enable owner adjustments” boxes are checked.
Step #2: Enable Users:
Next, it’s crucial to guarantee that individuals requiring access to forecasting possess the necessary permissions.
Here’s the procedure within Sales Cloud:

- Go to the Setup page and locate the ADMINISTRATION section on the left-hand side.
- Select Users from the options provided.
- To modify permissions for a particular user, click on the Edit button adjacent to the user’s name. This will bring up the General Information box.
- Tick the Allow Forecasting box and then save your changes.
Step #3: Create a Forecast Hierarchy:
Now that access has been granted to the relevant team members, it’s time to establish a forecast hierarchy.
But what exactly does a forecast hierarchy entail?
A forecast hierarchy mirrors the organizational structure or reporting chain within your business. It outlines how individuals are grouped into different tiers or positions for the purpose of collaborative forecasting.

Collaborative forecasting entails the collective contribution of various stakeholders, such as sales and marketing teams, promoting cooperation to produce more precise and insightful forecasts.
This structure aids in determining reporting lines and the flow of forecasting data throughout your organization.
Here are the steps to create a forecast hierarchy:
- Navigate to the Setup page and input “Forecast Hierarchy” into the Quick Find box.
- Choose “Forecasts Hierarchy” from the available options.
- Select “Expand All” to view the accessible roles.
- Click on the “Enable Users” option adjacent to one of the displayed roles.

Transfer individuals from the section labeled “Available Users” to the list titled “Enabled Users.”
To designate a forecast manager for every role within the hierarchy, select the “Assign Manager” option beside the respective role. Then, pick a name from the drop-down menu labeled “Forecast Manager” and save your selection.
Repeat these instructions for each type of role.
Step #4: Customize Forecast Categories:
For precise sales predictions, it’s essential to categorize opportunities into distinct forecast stages like Pipeline, Commit, Best Case, Omitted, or Closed.
These categories represent different phases in the sales cycle, providing a clear overview of opportunity statuses and guiding the sales forecasting process.

To tailor forecast categories, follow these steps:
- Go to the Setup page and select the Object Manager from the drop-down menu.
- Navigate to Opportunity > Fields & Relationships > Forecast Category.
- In the Salesforce Forecast Category Picklist Values section, choose the Edit option next to the category you wish to modify.
- Enter a new name (e.g., Commit or Closed) in the Label field.
- Save your changes.
- Once customized, these forecast categories will be visible in the Forecasts tab for easy reference.
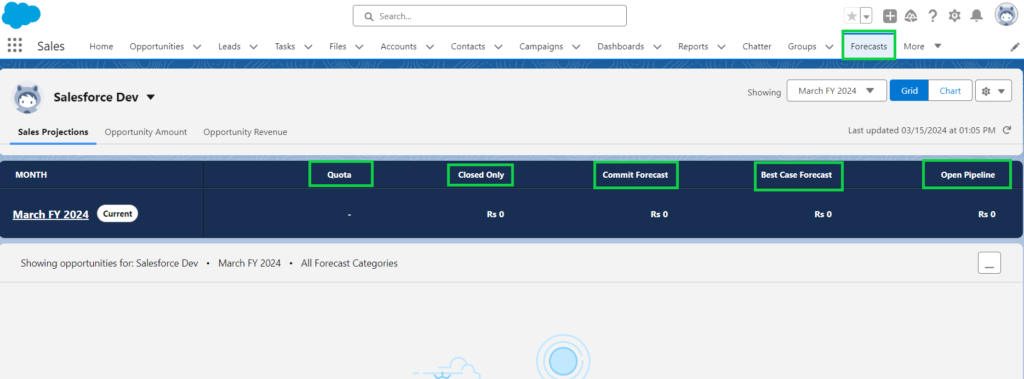
Each segment in the Forecasts section displays the cumulative monetary value linked to it within a designated timeframe. What if you aim to inspect the particulars of particular opportunities?
This action will unveil diverse opportunities along with their specific details, including the opportunity’s name, account name, amount, forecast category, and additional information.
Step #5: Choose a Forecast Currency (Optional):

If your company deals in various currencies, you have the option to modify the projected currency by following these steps:
- Go to Setup, enter “Forecast Settings” in the Quick Find search bar, and choose “Forecasts Settings” from the results.
- Scroll to the Default Currency section.
- Select a currency from the Forecast Currency options.
- Save your changes by clicking the Save button.
How to set up forecasting in salesforce: Let’s do it!
Tag:Customizing forecast categories in Salesforce, Enable forecasting in Salesforce, Forecasting permissions Salesforce, Sales Cloud forecasting, Salesforce forecast configuration, Salesforce forecast hierarchy, Salesforce forecast manager, Salesforce forecasting setup, Salesforce forecasting tutorial, Salesforce sales predictions setup




2 Comments